When spending leisure time near bodies of water, remember the danger they pose for the unwary swimmer. After all, swimming and diving can bring both pleasant memories and terrible life experiences. Fortunately, if you follow the safety rules on water, the chance of such emergency incidents is extremely small.
Common causes of drowning are hypothermia or overheating, which can cause loss of consciousness and subsequent filling of the lungs with water. Increases the risk of convulsions during hypothermia. The possibility of disorientation of the victim due to alcohol intoxication, which leads to a weakening of the ability to rationally assess his condition, cannot be ruled out. At the moment when the victim loses consciousness, the body does not stop breathing to maintain vitality. Therefore, an unconscious person's automatic attempt to breathe will result in the airways and lungs filling with water. This is fraught with fatal consequences in a situation where first aid for drowning was not provided or it was provided incorrectly.
First aid for drowning - what to do?
The main threat that leads to a tragic outcome is the ingress of fluid into the respiratory tract and lungs. The volume of liquid ingested is directly related to the time a person spent under water.
First aid for drowning will be relevant when you are under water for three minutes.
After passing the five-minute mark, the chances of survival tend to zero.
The main thing to remember before providing first aid for drowning is that you should act carefully, calmly and calmly. It is natural that when a drowning person panics, he is fighting for his life. And it’s a completely different matter when the rescuer panics. An important point that will affect the likelihood of success is the presence of swimming skills. If you have completed basic training at school or university in physical education classes, then these will be quite enough (Figure 1). Be prepared for the fact that a drowning person may accidentally pull you under the water, hugging you tightly, because he is in a state of mortal panic. First aid techniques for drowning will vary depending on the amount of water in the lungs.
Figure 1. When rescuing a drowning person, be careful: the drowning person can drag you to the bottom too
There are various types of drowning, first aid for which will require special skill, and the primary ones are:
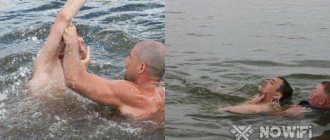
- First aid for drowning in water will be most effective if during its implementation the chance of salvation is objectively high. For an unqualified rescuer, it will only work if a person floundering in the water was noticed immediately. Help him stabilize on the water, take a breath, cough up water and come to his senses. In situations where the victim’s lungs are filled with water, a forced march awaits you with the body at the ready. Swim up from behind and grab him by the armpits or, in extreme cases, by the hair. Turn the drowning person onto his back and swim to the shore, avoiding attempts to grab you;
- First aid for someone drowned on land is a life-saving straw for someone who was in the water for more than three minutes and was quickly brought to shore in an unconscious state. In this scenario, it is necessary to begin providing first aid for drowning as quickly as possible. It will consist of a procedure to restore the pulse, expel water from the lungs and restore spontaneous breathing.
When rescuing a person in water you must:
- — Swim up to the victim from behind.
- — Grab a drowning person by the hair or part of his clothing (for example, a collar).
- - Deliver the drowning person to the shore on his back, fixing his head above the water.
Correct determination of the type of drowning plays an important role after removing a person from the water. The type can be determined by external signs.
The victim's face and neck are blue or gray in color, the vessels of the neck are clearly visible against the background of others, and pink foam appears at the mouth of the victim. In this case, we are dealing with the so-called blue drowning. This 100% means that water entered the victim’s stomach and lungs.
The fact is that a drowning person, saving his life, spends a lot of energy while under water, and also does not breathe for a long time. In this case, the body does not receive vital oxygen and the drowning person most often loses consciousness. Thus, the victim's lungs and stomach fill with fluid.
Primary or “wet” drowning
When, with the last of his strength, a person grasping at the opportunity to escape flounders in panic and tries to stay on the surface, he swallows huge volumes of liquid. By filling the space inside the alveoli, water does not allow oxygen to penetrate into the blood, thus disrupting the natural oxygen cycle in the body. This causes a state of oxygen deprivation called hypoxia, which can cause the skin to turn blue. Also noticeable signs will be swollen veins in the neck and pink foam from the throat.
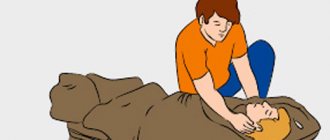
Figure 2. After you have pulled the drowning person out of the water, clean his mouth from algae and other dirt, and then proceed to remove fluid from the stomach and respiratory tract
To avoid death, you need to know how to provide first aid to a drowning person (Figure 2):
- Spending extra time checking your pulse can play a cruel joke, so it’s better to skip this moment;
- Begin the procedure of cleansing the stomach of excess fluid;
- Throw the adult belly down over a thigh or bench, then press firmly onto the back. A small child can be turned upside down and shaken;
- Clean the oral cavity from sand and algae;
- Next, trigger the gag reflex by sticking two fingers deep into the throat and pressing on the tongue;
- If vomiting occurs, you can relax, because this indicates the presence of a pulse;
- If the gag reflex does not follow, you need to start the procedure of chest compressions;
- When the moment has come to remove water from the lungs, grab the person by the armpits from behind and begin to squeeze the sides of the chest. At the same time, insert two fingers into the drowned man’s throat;
- As soon as the victim stops coughing up liquid, turn him on his side and cover him with something warm: a blanket, a towel, outerwear.
Methods (techniques) of salvation
- The first thing you should do when you see a drowning person is to notify professional rescuers if possible.
- If possible, throw a lifebuoy, an air mattress or something similar to the drowning person.
- If you decide to swim to a drowning person, you should remove as much outer clothing as possible, since it will only get in the way.
How to swim
You need to swim up to a drowning person only from behind, because a person who is drowning is in a stressful situation and has practically no control over himself. He can grab onto his rescuer with considerable force and pull him to the bottom.
If you cannot swim invisible to a drowning person, you need to dive a couple of meters before him and, swimming up to the drowning person, grab him. Thus, the victim will not be able to harm either himself or his rescuer.
Pickup and transport
Methods of transportation depend only on the condition of the person who is drowning.
If the drowning person remains relatively calm, can control his body and obeys the advice of the person saving him, then he can be brought to land using this method: you need to swim on your stomach with breaststroke, and the drowning person should hold on to the rescuer’s shoulder, while lying on the water and helping The rescuer moves forward with small jerks with his legs.
If the person who is drowning is in shock or panic and does not understand what is being said to him, then it is better to use the following types of transportation:
- Turn the person around and press him towards you, firmly grabbing him by the armpits or chin. Swim breaststroke on your back or side in this position.
- Turn the person's back to you and grab him by the armpits or head, swim breaststroke on your side in this position.
- Turn the person being rescued onto his back, grab him by the armpit with one hand and, clasping his forearm on the other side, swim on his side, rowing with his unoccupied arm and legs. This is the most difficult type of transportation and is used only when the drowning person is very scared.
- If a person is already submerged at the bottom of a reservoir, then he will need to dive and swim along the bottom where the victim may presumably be located.
- Having found a drowning person, you need to grab his armpits or arms, then push off with force from the bottom and emerge to the surface of the water, working as quickly as possible with your legs and unoccupied hand.
Having emerged, you should turn the person’s back to you and, without hesitating a minute longer, swim with him to the nearest shore:
- If a drowning person is at the bottom of a reservoir facing the bottom, then you need to swim to him from the feet.
- If he is at the bottom face up, then you need to approach him from the side of the head.
Asphyxial or “dry”
Pale skin and fine pink foam from the lungs are indicators of dry drowning. The reasons preceding this are severe relaxation of the nervous system in a state of alcoholic intoxication, or any other disturbances in the functioning of the central nervous system. “Dry” is a fairly common type, caused by an involuntary spasm of the glottis due to liquid entering it, causing irritation.
Figure 3. Scheme of manifestation of laryngospasm during “dry” drowning
By closing the entrance to the lungs, laryngospasm leads to suffocation due to oxygen deficiency (Figure 3). However, the liquid does not penetrate the lungs until the person loses consciousness and the relaxation phase sets in, making rescue many times easier. Therefore, you can skip the phase of squeezing fluid out of the lungs and immediately move on to more necessary procedures.
The first aid that should be provided to a drowned person will be very simple, but requires preliminary training or experience:
- Lay the victim stomach up on a hard surface. For example, on a hard wooden bed or concrete slabs;
- Begin the resuscitation procedure;
- Without bending your elbows, place your hands on the victim’s chest;
- Push with your entire body every half second;
- Tilt the victim's head back until an obtuse angle is formed between the chin and neck;
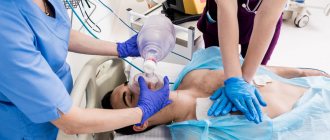
- Alternate compressions with artificial ventilation using the mouth-to-mouth principle (Figure 4);
- Pinch the patient's nose and take a sharp breath;
- Exhale sharply into his mouth and open his nose;
- Carry out the procedure at intervals of 4-5 seconds. The recommended frequency is 2 exhalations per 30 compressions;
- When a pulse appears and spontaneous breathing appears, you can calm down and provide further assistance: help the victim get to the nearest warm room for further warming with tea and a warm blanket.
Figure 4. First aid steps for dry drowning
If the victim shows no signs of life
This is a more severe case and the first aid provider must know that the life of the victim depends on his actions at this moment and the provision of correct first aid.
If the victim does not gag when pressing on the base of the tongue, do not waste precious time trying to further remove water from the body.
It is necessary to immediately check the victim’s reaction to light by shining light into his pupils and checking the pulse in important vital arteries. If there is no pulse, then cardiopulmonary resuscitation must be started immediately. During resuscitation, it is necessary to periodically turn the victim onto his stomach and remove the contents from the mouth. The interval of these procedures is approximately three minutes.
Artificial respiration
Currently, artificial respiration is recommended to be performed using the mouth-to-mouth or mouth-to-nose method.
The manual methods of artificial respiration that existed in the past (Sylvester, Schaefer, Holgert-Nilsson, etc.) are practically not used because they are ineffective. For each breath when performing manual artificial respiration, the victim receives only 200-300 ml of air instead of 1000-1500 ml.
Note that exhaled air is quite suitable for artificial ventilation of the lungs in situations of high urgency. Scientists have calculated that the air exhaled by the rescuer provides the victim with an amount of oxygen approximately equal to what a person living at an altitude of 2 thousand meters above sea level receives under normal conditions, i.e., quite sufficient for an almost normal existence.
Before starting artificial respiration, it is necessary to ensure patency of the airways; without this, using any method is pointless.
In an unconscious state, the muscles of the neck and head relax, which leads to retraction of the root of the tongue and epiglottis and, as a result, blockage of the airways.
The simplest and most reliable way to ensure patency of the airway in an unconscious patient is to tilt the head back. You can use a roller 15-20 cm high, which is placed under the shoulders, but wasting precious minutes trying to find such a roller or making one out of something is unacceptable!
To ensure a complete exhalation, the rescuer holds the victim’s head tilted back after artificial inhalation.
You can tilt your head back by placing one hand under the victim’s neck and the other on the forehead. It is necessary to quickly clear the victim’s mouth of silt, sand, etc. with a finger wrapped in a cloth.
To prevent vomit from entering the lungs, the victim’s head must be turned to the side and the opposite shoulder raised so that the mouth is lower than the chest.
1. Stand to the side of the victim.
2. Place one hand under the victim’s neck, with the thumb and forefinger of the other hand, pinch the nasal passages, and with the edge of the palm, resting on the forehead, throw back the head, while the mouth, as a rule, opens.
Performing artificial respiration using the mouth-to-mouth method
3. Take a deep breath, slightly hold the exhalation and, bending over the victim, press your lips tightly to the victim’s mouth, creating a dome over his mouth, as if impenetrable to air, after which you need to quickly exhale.
Attention! Lack of tightness is a common mistake during resuscitation: air leakage through the nose or corners of the victim’s mouth negates all efforts! When performing artificial respiration, it is necessary to continuously monitor whether the victim’s chest rises well during artificial inhalation. The inhalation should last about one second.
4. After the end of the inhalation, the person providing assistance unbends, under no circumstances changing the position of the victim’s head, since otherwise his tongue will sink and there will be no full exhalation. The exhalation usually lasts about 2 seconds.
5. In the pause before the next inhalation, 4-6 massage movements are performed on the heart.
Repeat the entire cycle, performing 16-18 breaths per minute in combination with cardiac massage (70-72 massage movements per minute).
Artificial respiration technique using the “mouth to nose” method
1. Stand to the side of the victim.
2. Place one hand on the victim’s forehead and the other on his chin, throw back his head, and at the same time press the lower jaw to the upper.
3. Using the fingers of the hand supporting the chin, press the lower lip, closing the victim’s mouth tightly.
4. After a deep breath, cover the victim’s nose with your lips, creating an “air-tight dome” over it.
5. Exhale forcefully into the victim’s nose. The victim's chest should expand and artificial inspiration will occur.
Placing a scarf or other fabric over the mouth or nose for hygienic and aesthetic reasons does little to help, and also impedes the movement of air. Artificial ventilation using the “mouth to mouth” or “mouth to nose” method is the only real opportunity in primitive conditions to save a victim with respiratory arrest.
Performing artificial respiration using the mouth-to-nose method
If the rescuer has a special air duct, the victim is placed on his back, a cushion is placed under the shoulder blades, and the head is tilted back. An air duct (a curved, dense rubber tube with a round shield in the middle that prevents air leakage) is inserted at one end into the victim’s mouth. It is recommended to first insert the air duct between the teeth with the convex side of the bend down, and then turn it with the concave side down and slide it along the tongue. When installed correctly, the air duct should press the tongue to the floor of the mouth, eliminating the possibility of the tongue retracting and closing the larynx. The victim's nose must be pinched on both sides with your fingers. Take a deep breath, then take the mouthpiece of the air duct into your mouth and exhale through it into the victim’s lungs, then move your mouth away from the mouthpiece. At this time, the victim will exhale passively.
If the revival actions are carried out by one person, then artificial respiration and cardiac massage should be combined in a ratio of 1:4, 1:6, i.e. after one breath, 4-6 massage movements must be made. Other combinations are possible – 2:15; It is important that 16-18 breaths and 70-72 massage movements are performed per minute.
Heart massage
Since the 60s of the 20th century, in case of circulatory arrest, the method of indirect, or closed, cardiac massage has been widely used. It was this method, due to its simplicity, accessibility and low morbidity, that made it possible to successfully revive sudden death outside of medical institutions.
What is the mechanism of cardiac massage?
As you know, the heart is located between two bone formations: the sternum and the spine.
If a person in a state of clinical death is placed on his back on something hard (the floor, table, edge of the bed, etc.), and the lower third of the sternum is pressed with both hands with such force that the sternum bends 3-5 cm, the heart is compressed between the bone surfaces - artificial compression occurs, i.e. systole of the heart, during which blood is pushed out of its cavities into large arteries. As soon as you release your hands from your chest, due to its elasticity, the heart returns to its original volume, that is, diastole occurs, during which blood from the large veins flows into the cavity of the heart.
1. Place the patient on his back on a hard base (on the ground, on the floor, on the edge of the bed, etc.).
Attention! Carrying out a cardiac massage on a soft surface is not only ineffective, but also dangerous: you can rupture the liver!
2. Unfasten the waist belt (or part of the clothing that tightens the upper abdomen) to avoid injury to the liver during cardiac massage.
3. Stand to the left or right of the victim.
4. Place the palm of one hand (after sharp extension at the wrist joint) on the lower half of the victim’s sternum so that the axis of the wrist joint coincides with the length of the axis of the sternum.
5. To increase pressure on the sternum, the person providing assistance places the second hand on the back surface of the first. The fingers of both hands should be raised so that they do not touch the chest during the massage. The hands should be positioned perpendicular to the surface of the victim’s chest; only with this position of the hands can a strictly vertical push of the sternum be ensured, leading to compression of the heart.
The person providing assistance quickly leans forward and, using the weight of the body, makes a massage movement, pressing the sternum towards the spine by 3-5 cm. This is only possible with an average pressure force of about 50 kg, so cardiac massage should be carried out not only using the strength of the hands, but also body weight. The person providing assistance should press on the sternum with their hands straightened at the elbow joints.
6. When the heart is compressed between the sternum and the spine, blood from its cavities is pushed into large arteries.
7. After pressing on the sternum, you need to quickly lower your hands. At this time, artificial compression of the heart (systole) is replaced by its relaxation (diastole).
8. The optimal rate of indirect cardiac massage for an adult can be considered 70-72 movements per minute.
Carrying out indirect massage for children and adolescents
much easier, since their chest is more mobile and elastic. For children under 12 years of age, indirect cardiac massage is performed with one hand at a rate of 30-60 movements per minute. The sternum can be shifted by 1.5-2 cm.
You need to be especially careful when helping newborns and infants. To perform indirect cardiac massage in infants, the effort of two fingers of an adult is sufficient. The frequency of shocks should be more than 100-110 per minute. In case of drowning, indirect cardiac massage must be combined with mouth-to-mouth artificial respiration. If the victim is assisted by one person, then artificial respiration should be alternated with chest compressions. After every 3-4 exhalations into the victim’s lungs, it is necessary to make 8-10 pushes to the sternum.
Attention! When performing indirect cardiac massage, a complication is possible: a rib fracture, which is determined by a characteristic crunch during compression of the sternum. This complication should not serve as a reason to stop massage.
A reliable sign of the effectiveness of cardiac massage is the constriction of the pupils.
So, a set of measures to revitalize can be considered effective if the pupils are constricted, the skin turns pink, and with massage shocks the pulse is clearly felt in the carotid, femoral or radial arteries.
What do the signs of the effectiveness of the revitalization complex indicate? First of all, cerebral circulation has improved. Under these conditions, revival can continue even for several hours until the victim begins to have an independent heartbeat.
If you started resuscitation in case of sudden cardiac arrest and your resuscitation techniques turned out to be complete (pupils narrowed, lips turned pink, pulse in large vessels is detected during cardiac massage) and the chest expands during artificial respiration, and independent heart contractions do not resume, continue resuscitation and wait for the ambulance to arrive. If you are tired, let someone replace you, but make sure that he carries out the revival just as competently.
If the revival measures are carried out by one person:
1) you need to stand on the side of the victim;
2) with one hand, take the victim under the neck, with the thumb and forefinger of the other hand, pinch the nasal passages, with the edge of the palm, leaning on the forehead, throw back the head;
3) placing your lips tightly against the victim’s mouth, exhale quickly and forcefully into the victim’s airways; at the same time, the volume of the victim’s chest will increase;
4) then the person providing assistance begins cardiac massage;
5) placing one hand on the other, you need to make 4-6 strong massage movements on the area of the lower half of the sternum;
6) artificial respiration and cardiac massage should be alternated sequentially until the arrival of the resuscitation team.
If the revival measures are carried out by two people (Fig. 67):
1) one person stands on the side of the victim near his head and performs artificial respiration using the “mouth to mouth” or “mouth to nose” method; after the end of artificial inhalation, the victim’s head is thrown back, holding it with one hand, with the other he opens the victim’s eye and observes the constriction of the pupil during a heart massage performed by another rescuer;
2) the other person providing assistance stands nearby so that his hands are perpendicular to the surface of the victim’s chest, placing his hands on the lower half of the sternum, makes 4-6 strong pressures on it, bending the sternum by 3-5 cm.
During artificial inhalation, the victim's chest expands.
Once the revival has begun, events can develop in different ways.
First option.
The rarest, the so-called “miracle revival”: immediately after 2-3 compressions on the sternum and 1-2 artificial breaths, the victim’s heartbeat, breathing and consciousness are restored. After just a few minutes, it is impossible to believe that the person was in a state of clinical death. The victim does not remember anything about the incident.
However, no matter how “healthy” the person you revived may seem, he must be hospitalized, since on the second or third day, people who have experienced clinical death often worsen their condition.
Second option.
If artificial respiration and cardiac massage are carried out correctly, then in the next minute signs of the effectiveness of resuscitation appear: a good pulsation is detected in the carotid and femoral arteries during the massage; the pupils gradually narrow; the skin and lips turn pink. If there are such signs, then your resuscitation measures are effective and you should not stop resuscitation until medical workers arrive.
If necessary, you can and should perform cardiac massage and artificial respiration for several hours. The fact is that often with good artificial circulation of oxygenated blood throughout the body, there is no oxygen starvation, but the independent functioning of the heart is not restored.
A factor that often causes a delay in the recovery of cardiac activity may be fibrillation - a special condition of the heart muscle when all its fibers contract separately, rather than together. A fibrillating heart contracts only formally, but in fact it does not fulfill its role as a pump.
Elimination of fibrillation is carried out only by doctors. It consists of the following: electrodes from a powerful capacitor are connected to the chest in the area of the heart. When you press a button, a charge of 3.5-6 thousand V is applied to the heart in one hundredth of a second. An instantaneous blow eliminates the electrical disconnection of the muscular elements of the heart - a simultaneous contraction of the entire myocardium occurs, i.e., normal cardiac activity is restored.
Third option.
If in the next one to one and a half minutes of massage in combination with artificial respiration no signs of its effectiveness appear, you must immediately:
– check whether there are any elementary errors in the massage technique (soft base, incorrect choice of point of application of force, non-vertical position of the hands, insufficient bending depth) or in the ventilation technique;
– compress the abdominal aorta, to do this you need (not roughly) to press a large vessel with your fist to the left side of the spine, pulsating during the massage in the depths of the abdomen approximately at the level of the navel; the circle of blood circulation is shortened and the volumetric velocity of blood flow in the cerebral and coronary vessels increases; unfortunately, this manipulation requires free hands;
– change the filling of the right ventricle of the heart.
As a rule, during clinical death in a patient, due to deep inhibition of the vasomotor center, the bloodstream expands sharply and the existing volume of blood cannot fill it, and therefore the filling of the right ventricle of the heart decreases and, consequently, the pulmonary circulation and the left ventricle of the heart become empty. In most cases, after a sudden stop of blood circulation, in order to increase the effectiveness of indirect massage, it is advisable for a patient to increase the blood flow into the right ventricle of the heart by raising his legs 50-75 cm above the level of the heart (a chair, bench is placed under his legs, or one of the assistants is holding them). Resuscitation must be carried out until the doctor arrives.
If, as a result of the measures taken, the victim’s cardiac activity, independent breathing and consciousness have been restored, he should still be sent to the hospital, since the victim, as a result of clinical death, develops a new condition - “disease of a revived organism”, he needs hospitalization and medical supervision.
If only cardiac activity is restored, the victim is hospitalized in the intensive care unit for long-term artificial respiration and complex treatment aimed at eliminating the disorders caused by clinical death and its consequences.
With the restoration of cardiac activity as a result of the simplest revival techniques, resuscitation does not end, but only begins. Moreover, patients and victims who have suffered any terminal condition require long-term, multifaceted treatment.
So, the victim has brain damage, breathing and blood circulation are impaired. “Breathing is shallow and frequent. Inhalations are uneven, pauses appear... The tongue sinks... There is bubbling in the trachea... Pauses are becoming more frequent, breathing is becoming less frequent...” And this means that the phenomenon of “paralysis of the command” of breathing is increasing. The fact is that the respiratory center, the main part of which is located in the medulla oblongata, has its own activity: the respiratory center is periodically excited and sends the command “inhale”. The level of oxygen and carbon dioxide in the blood regulates the strength and frequency of commands. When the medulla oblongata is directly contused or when it is displaced due to the accumulation of blood in the skull, the cells of the respiratory center stop producing a “command” - respiratory movements fade away.
The patient is transferred to artificial (hardware) respiration: a plastic tube is inserted into the larynx through the mouth and a breathing apparatus - a respirator - blows air into the lungs, after which the patient allows the patient to exhale: the chest and lungs collapse due to elasticity, as with normal independent breathing. The frequency of breaths is 16-18 per minute. To improve oxygen delivery, inhalation is carried out not with air, but with a mixture of it and oxygen (35-40%).
And doctors will do much, much more to bring a person back to life. They will try.
It was a short excursion to a large intensive care unit...
What should everyone know?
It is practically possible to bring a victim out of clinical death only when measures to revive are started immediately in the first minutes.
In the event of the sudden death of a loved one, salvation is possible only when the resuscitator skill of those around them, the so-called “dynamic stereotype”, is triggered: a complex of brain commands well-developed as a result of repeated repetitions. It is precisely this stereotype that helps, for example, a pilot get out of difficult situations, and a surgeon instantly stop sudden bleeding even before he realizes where the bleeding is coming from.
There are some features of first aid in specific cases. If clinical death occurs due to drowning,
the rescuer must tip the victim with his stomach onto his own bent knee (to empty his stomach of water) and immediately begin resuscitation measures;
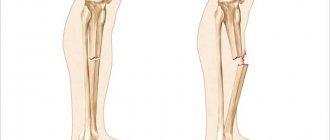
if there is a suspected fracture of the cervical spine (in divers) or in case of a traumatic brain injury
, the head should not be thrown back; to ensure patency of the airway, the lower jaw should be pushed forward. To do this, the person providing assistance should stand at the head of the victim, take the lower jaw with both hands and, conveniently placing his fingers at the corner of the lower jaw, push it up.
What to do to avoid drowning
1. Have time to take a deep breath.
2. Float to the surface of the reservoir if you have fallen from a height and take an optimal position: your head is thrown back, your arms and legs are spread out to the sides and pulled back. Breathe with a delay, filling your lungs.
3. Take off your clothes and shoes.
4. If there is hope for help: shout “Save!” and wave your hand. But know that you have to pay for this - your face will go under water. However, there is nothing to worry about. You need to have time to inhale and use your arms to stay on the surface of the water.
5. Try to calm down, look around and, having chosen the shortest direction, slowly row towards the shore, pier or other life-saving facility. Follow the rules of conduct when relaxing on the water and be careful!
Syncopal drowning
This type of drowning occurs due to reflex cardiac arrest, provoked by temperature shock caused by entering ice water from a hot environment. Intense physical activity, such as running, which heats up the body, will also be risk factors. Intoxication and overeating will also not be beneficial and will only increase the risk of drowning.
Figure 5. If you pulled a drowning person out of cold water, the chances of saving him are higher than saving him in the warm season
Visually, the victim will stop all actions and begin to drown due to the shutdown of all higher nervous activity and the absence of any motor skills. Therefore, it is necessary to dive for the drowning person as quickly as possible and try to pull him to shore.
First aid for drowning will consist of resuscitation procedures for artificial ventilation and chest compressions (Figure 5).
If this happened in icy water, then the chances of survival will increase. Due to the slowdown of all biological processes in a cold environment, including oxygen metabolism, this will allow the drowned person to be restored to their condition even after 10 minutes.
Remove water from the lungs and stomach of a drowning person
If you experience a "pale" drowning, move on to the next step.
In case of “blue”, and also if the victim is conscious, but has swallowed water, it is necessary to act as follows:
- throw the drowning person face down over your knee;
- Unclench your teeth, put two fingers in his mouth and sharply press on the root of his tongue to trigger a gag reflex.
If a person begins to vomit or has a cough, continue to press on the root of the tongue for 5-10 minutes until water stops pouring out of the mouth and nose. Your task is to help the victim get rid of the liquid that has entered the stomach and lungs as much as possible.
If neither a gag reflex nor a cough appears, and also in less complex cases, continue in accordance with the general Drowning Treatment first aid algorithm.
Secondary drowning
Quite a dangerous phenomenon due to its non-obviousness. It usually occurs after the primary one and carries a hidden threat that can only be detected by careful observation. The mechanism by which this phenomenon occurs is quite simple. After removing water from the lungs, some fluid may remain inside in the form of droplets, which will interfere with the proper functioning of the respiratory system. This will lead to a depletion of oxygen in the body and a subsequent lack of oxygen in the brain. In adults, this problem is solved by the body itself, but for children it poses an increased danger, since the area of their lungs is relatively smaller and any violation will lead to prolonged oxygen starvation. The secondary type of drowning can be detected over a time period from an hour to a day.
Figure 6. If these symptoms appear after drowning, call an ambulance immediately
Symptoms to look out for (Figure 6):
- Difficulty breathing;
- Prolonged cough that does not go away for several hours;
- Pain in the chest cavity;
- A slight temperature deviation from the norm;
- Sudden crippling fatigue accompanied by drowsiness;
- Impaired thinking abilities and odd behavior;
- Nausea and heaviness in the stomach.
When faced with these symptoms, it is necessary to call an ambulance, but it may not always arrive on time (Figure 7).
Figure 7. When calling an ambulance, do not rely only on its quick arrival, provide all possible CORRECT first aid
When you are pressed for time, do the following:
- Sit down and ask your child to lie on your back, feet up;
- Grab your hips with your hands and secure them on your shoulders;
- Then stand up straight and ask the child to cough while shaking him.
Determine the type of drowning
Experts from the Russian Ministry of Emergency Situations distinguish between two options: First aid for a drowning person. They are named after the skin color of the person who has just drowned.
"Blue" drowning
It happens when a person fights for life to the last. Usually people who don’t know how to swim and accidentally find themselves in the depths drown this way. Or, for example, children falling into the pool. Or swimmers who were carried away by strong currents.
In an effort to escape, they hold their breath for a long time, but at the same time actively move, even when they find themselves under water. Oxygen is quickly consumed, and brain hypoxia occurs. The person loses consciousness, and at this moment water in large quantities penetrates the stomach and lungs. Then it is absorbed into the blood, dilutes it, and it seeps through the walls of blood vessels. Because of this, the skin acquires a characteristic bluish color.
Additionally, deadly disorders develop:
- The heart is overstrained. It is difficult for him to pump through the increased volume of blood, and besides, due to the lack of oxygen, he does not have enough energy to do this. If a person is not pulled out of the water in time and resuscitation measures are not started, the heart may stop;
- Gas exchange in the lungs worsens. The liquid that gets into them foams. This can be seen as pinkish, frothy mucus coming out of the mouth and nose when you exhale or try to cough. An additional sign is bubbling breathing, as if something is boiling in the chest. Again: in the absence of timely medical assistance, this can lead to respiratory arrest.
"Pale" drowning
It happens when a person drowns in an unconscious state. For example, if you fell into the water, slipped and hit your head on the side of the pool. Also, “pale” drowning is observed in case of shock (when a person, say, falls through the ice) or if the water is highly chlorinated.
In such situations, laryngospasm occurs - the glottis closes completely. This is a protective reaction of the body: thus blocking the flow of water into the lungs. In this case, the drowning person does not inhale the liquid, which means that it almost does not penetrate into the stomach.
"Pale" drowning is considered more favorable than "blue" drowning. Yes, a person’s breathing and blood flow completely stop, but if you start resuscitation within 5 minutes after a spasm, there will be much less severe consequences.
First aid for drowning: algorithm of actions
When faced with an emergency on the water, it is necessary to follow a certain algorithm that will help save lives.
First aid for drowning briefly point by point in chronological order:
- Ask someone to call an ambulance;
- Pull the body out of the water onto the shore;
- Don't waste time checking your pulse;
- Immediately begin resuscitation procedures;
- Follow the instructions for each scenario;
- Help the victim come to his senses;
- Wait for paramedics to arrive.
By following the above algorithms and remaining calm, you will be able to determine what type of drowning you are faced with, after which you can easily provide first aid that will save someone else’s life.
Rules of conduct on reservoirs
- On this topic ▼
Safety of people on water bodies
Games and water activities involving the capture of a person are prohibited.
- Do not scream if you are drowning or have any accident on the water. When screaming, a person takes deep breaths, which leads to swallowing water. Getting into the lungs makes breathing difficult.
- If you feel tired, don't ignore it. Give yourself time to rest. Just lie on your back on the water, spreading your arms and legs to the sides.
- If you feel that you are starting to freeze, do not expect spasms. By alternately tensing the muscles of your arms and legs, you will warm up your body.
- If your leg muscles spasm, you need to dive and pull your leg by the big toe to straighten it.
- You should not dive if the area is unfamiliar to you. Even if you are an excellent swimmer, do not ignore the installed buoys. There may well be an undercurrent and other dangers behind them.
There are various extreme situations in which it is necessary to behave competently, but when they find themselves in them, people get lost and panic. Thus, they reduce the chances of a successful outcome.